I recently helped a customer start the process of importing their Remedy Knowledge records into ServiceNow for a one-time bulk upload process.
The folks at the company provided a dump of their Remedy Knowledge database in a series of XML files and attachment files. The format of the files looked like this:

All of the articles were located in a “publish” directory that contained an XML file for each article. The attachments were stored in an “attachments” directory. There was a directory for every article that contained attachments. All of the attachments for that article were contained within that directory.
Overview
I was able to create a generic integration to import Remedy Knowledge Management XML records. Associated with this integration is a zip file that contains an update set for your instance as well as a Perl script for a machine that contains the xml files.
First, you should upload all of the attachments for the knowledge articles onto a public web server (or even your instance). This OOB integration uses the assumption that the folder structure will remain the same (eg. ./{articleID}/{attachmentName.extension}) on the web server.
Second, you will install an update set that adds some libraries, transform data, and configuration modules to your instance. You will then need to view your articles and configure the KMS Import Config module to accomodate for the type of data within your articles.
Third, once all configurations are finished in the instance, you run the perl script which will send the XML files up to the instance to be transformed into ServiceNow knowledge articles. The articles are then parsed by the transform scripts such that all attachment URLs in the document point to the new location where you uploaded the attachments.
Step 1: Upload the Attachments
The easiest option is to upload the attachment files to a web server within your network, or on the public internet (depending on sensitivity of the documents). To do this, the “attachments” directory to the web server. In this example, I will copy the documents to:
https://john-james-andersen.com/temp/kms
This will give me a directory structure of:
https://john-james-andersen.com/temp/kms/attachments/
Step 2: Configure the Instance
Install the update set that comes with the zip file associated with this blog.
Once you have the update set installed, you will see two new modules in the Navigation Pane when you filter on “kms”:

I won’t document the Web Service import set that was created by the integration. You can view it on your own if you need to make modifications. That web service serves as a connection point for a perl script that is also included in this integration zip file. If you need to make modifications to the transform script, you can do so from that point as well.
There is also a Script Include that is created by the update set. You shouldn’t need to modify that unless you want to make customizations beyond the intent of this update set. (eg. Intelligently handle more than just attachments, but any javascript links, etc in the knowledge articles).
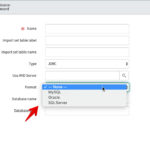
The “KMS Import Config” module is the primary point of configuration for this integration. You will need to create a new Configuration record for the integration:

Give the configuration set a name. In this example, I will use “FirstTry”. Also, set the Base Attachment URL. This is the base URL where we can find the “attachments” directory on a web server.

Click “Save” on this record. When the record refreshes, you will be given a related list at the bottom of the page. This list contains a number of “KMS Import Config Items”. This list will contain a number of XPATH statements that uniquely identify a section of the XML document that could be coming in with the import. You will map the XPATH statement with a field on the Knowledge form. This will tell the transform where to migrate different portions of the old Remedy Knowledge record to ServiceNow. There are other fields as well for each KMS Config Item.

Configuration Set – Do not change this. This is the parent configuration record for the item.
XPath – This is the XPath statement that will parse the incoming XML document and grab the portion specified to map to a knowledge field. The example in this screenshot tells the parser that to look for the following element:
1 2 3 4 5 | <KMS_doc> <KMS_Section name='Title'> <KMS_data>title data goes here</KMS_data> </KMS_Section> </KMS_doc> |
The XPath will take the string “title data goes here” and map it as directed in the other portions of this form.
KB Field – This is the destination field on the Knowledge Base record/form. We will take the data selected from the XPath statement and push it to this field on the record in ServiceNow.
The following other form items only apply when you want several portions of the Remedy Knowledge record to go into the same field in the ServiceNow Knowledge Record. For example, there may be a workaround section and a proposed solution section in the remedy record and you want both of those to map to the “text” field on the knowledge record in ServiceNow.
Order – The “Order” field on this form tells the transform where to place this data in that field compared to other data sections that map to this same field.
Label – When sending different portions of the Remedy record to the same Knowledge Base field, you may wish to label each section. You can specify that label here.
Label Style – If using a label, you may wish it to stand out from the rest of the record text to indicate it is a label. This allows you to include CSS style information for the label.
The following is an example configuration setup that maps to specific fields as well as to some of the same fields.

Click on the image to enlarge it
Step 3: Execute the Perl Script
Once your configuration is complete, you simply need to execute the Perl script that is included in the zip file.
The Perl script uses the ServiceNow Perl API to process and therefore will require that you have installed that API to your perl interpreter as shown in the wiki instructions.
The Perl script has the following usage instructions:
=============================== kms.pl =============================== USAGE: kms.pl...Where: : The full path and name of the directory that contains the Remedy folder: "publish" : The ServiceNow KMS Import configuration set name : The url to the instance : ServiceNow user name with rights to add KB articles : ServiceNow user password EXAMPLE: kms.pl /home/rkmsDump/kms_data MyConfigSet1 https://myinstance.service-now.com admin mypassword --------------------------------
So, for our example, let’s say “publish” folder for the exported Remedy Knowledge records resides in “/home/John/remedy”
My instance is: “https://myinstance.service-now.com”
My credentials are: User: John.Andersen Password: BigDog
I would execute the perl script with the following parameters:
./kms.pl /home/John/remedy FirstTry https://myinstance.service-now.com John.Andersen BigDog
This will grab each xml file and send it via SOAP to our web service. The web service will transform the XML data and stuff the portions of the record in the correct places in our Knowledge Base form as indicated by our XPath configurations we set up. Also, during transform, any attachment links will be changed to refer to the newly relocated attachment files on our web server.
The Integration ZIP file
The following ZIP file will provide you the resources to perform the Remedy Knowledge Base import into ServiceNow as explained in this article. Please understand that you use this at your own risk and without any inferred support from me or ServiceNow. While the update set contains no records that change existing functionality in the product, you are always encouraged to use caution when uploading third party update sets into your instance.
Pre-Calgary
Integration: Import Remedy Knowledge records into ServiceNow


Hi,
Could you please suggest how to export the Remedy knowledge articles in XML format?
Thanks in advance..
Regards,
Kanak
@Kanak, I am sorry I cannot help you there. The exported files were provided to me by the customer.
I want to load Service-Now ticket data to my database through bulk upload. Could you please let me know the ways to do that.
@Gaurav,
The best way to get records from SN and bring them into another DB is to use the ODBC Driver:
Hi John,
I’m not sure how to create file structure in ServiceNow. The cloud version allows us to upload files but I can’t find a way to create folder for attachments, etc. That way our attachments are not migrated to SN instance but linked to our server. Could you advise? Thank you very much for the script by the way. It’s working great!
Nat
Nat,
Unfortunately, you don’t have a lot of options to you. I think you are limited to images only when uploading a ZIP file to the server for auto expansion. Browse to “System UI” > “Image ZIP Upload”. You can upload a zip file with a folder structure. The system will pull all the images from the zip file and place them on the server. It tries to preserve the file structure of the images by using “_” characters in the name.
For example, if a zip file has four images in the following zip structure:
a.png /Pictures
b.png /Pictures/Set1
c.png /Pictures/Set2
d.png /Pictures/Set2/Folder1
It will create the following URLs for the files:
https://MYINSTANCE.service-now.com/Pictures_a.png
https://MYINSTANCE.service-now.com/Pictures_Set1_b.png
https://MYINSTANCE.service-now.com/Pictures_Set2_c.png
https://MYINSTANCE.service-now.com/Pictures_Set2_Folder1_d.png
Again, this only works for images. If you need other file types, you will need to use your own web server to host the files.
Hi John,
I too have similar scenario.Would like to use import sets and ECC queue approach.
Had an XML file contains articles and attachment(s) within the articles.
Any pointers would be great.
Regards,
Mahesh.
Hi John,
By chance you haven’t done the same thing for CA Service Desk Knowledge base? The biggest difference all the articles are in one xml file. When I bring it into ServiceNow as one XML datasource the system has challenges parsing the contents of each article as the fields all have the same element name and the attributes defines the data.
1
11B67B9F54544E4CACFB81E94BD3286F
TOP>KM ERP>Web Now>Helpdesk
1348249669
1348249952