
Last week I worked with Principle Sales Consultant, and all around Oracle Guru, Warren Strange, author of “Strange Brew”. Together we took a couple of hours to set up a SAML 2.0 setup between a ServiceNow instance and and Oracle Identity Federation server.
While, you don’t have to customize either product to get this working, there are a few potential gotchas that we ran into. In order to help make this an easier process for everyone, we decided to write up our experience.
The ServiceNow Side
The first step we took was to configure ServiceNow as the Service Provider in this relationship. In order to do this, we had to do the following:
1) Enable the SAML 2.0 Plugin
You would typically call support, or talk to your account manager to get this activated on your instance.
2) Obtain the OIF Identity Provider Metadata
To obtain the metadata from the OIF server, we browsed to: http://yourserver.com/fed/idp/metadata
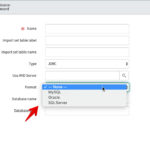
3) Configure the SAML 2.0 Properties in ServiceNow

For Label (1) in the above screenshot, we used the “Location” attribute in the IdP Metadata element that looked like:
1 2 3 | <SingleSignOnService Binding="urn:oasis:names:tc:SAML:2.0:bindings:HTTP-Redirect" Location="GET_THIS_VALUE_HERE"/> |
For Label (2) in the above screenshot, we used the “Location” attribute in the IdP Metada element that looked like:
1 | <SingleLogoutService Binding="urn:oasis:names:tc:SAML:2.0:bindings:HTTP-Redirect" Location="GET_THIS_VALUE_HERE"/> |
Change properties labeled (3) and (4) in the screenshot to be the ServiceNow instance URL that you are configuring. They will both need to be the same URL in this configuration. (Some instances have property (3) appended with “/navpage.doâ€. Do not include that for this configuration).
4) Import the OIF Certificate into ServiceNow
From the Oracle IDP Metadata, look for the X509Certificate under the <md:KeyDescriptor use=”signing”> section.

Copy that string and place it between the —–BEGIN CERTIFICATE—– and —-END CERTIFICATE—- strings in the SAML 2.0 Certificate in your ServiceNow Instance as seen below:

5) Build a ServiceNow SP Metadata document
This is the most complicated part of the process, but rest assured it is not that difficult. ServiceNow does not currently build the domain certificate into their SP metadata that they generate. However, Oracle requires the certificate to be in the metadata. We could not find a way to add the certificate manually. It doesn’t mean it can’t be done on the Oracle side, we just weren’t aware of how to do it. So, the easiest way to move forward is to modify the generated metadata from ServiceNow to include the public certificate PEM in the metadata.
You can get the PEM certificate metadata from your client browser when browsing to your ServiceNow instance. Use your browser’s certificate application to export the “*.service-now.com” certificate to PEM format. You should be fine just using the text we used below. If ServiceNow ever changes the certificate, then you will likely have to use the browser to get it on your own during this configuration.
In your ServiceNow instance, click on the “Metadata†link and copy the metadata to a text editor.
Add the following section to your meta data between the
1 2 3 4 5 6 7 8 9 10 11 12 13 14 15 16 17 18 19 20 21 22 23 24 25 26 27 28 29 30 | <KeyDescriptor use="signing" xmlns:md="urn:oasis:names:tc:SAML:2.0:metadata"> <ds:KeyInfo xmlns:ds="http://www.w3.org/2000/09/xmldsig#"> <ds:KeyName>*.service-now.com</ds:KeyName> <ds:X509Data xmlns:ds="http://www.w3.org/2000/09/xmldsig#"> <ds:X509Certificate xmlns:ds="http://www.w3.org/2000/09/xmldsig#"> MIID6TCCAtGgAwIBAgIQaWG5DFrv6VYEv/tPlqZYbDANBgkqhkiG9w0BAQUFADA8 MQswCQYDVQQGEwJVUzEVMBMGA1UEChMMVGhhd3RlLCBJbmMuMRYwFAYDVQQDEw1U aGF3dGUgU1NMIENBMB4XDTExMDcwNDAwMDAwMFoXDTEzMTAwMjIzNTk1OVowgYEx CzAJBgNVBAYTAlVTMRMwEQYDVQQIEwpDYWxpZm9ybmlhMRIwEAYDVQQHFAlTYW4g RGllZ28xGDAWBgNVBAoUD1NlcnZpY2Utbm93LmNvbTETMBEGA1UECxQKT3BlcmF0 aW9uczEaMBgGA1UEAxQRKi5zZXJ2aWNlLW5vdy5jb20wggEiMA0GCSqGSIb3DQEB AQUAA4IBDwAwggEKAoIBAQDACla2WcmR3wo3wxJZw/LJJJ9T5hMHmtCD+7Fgnfqy +cnTeJ0QK7TbjVkkIR6VoDqurZ/vmul0d8RlqaAhdvErEf7zHd5Iv55IIpZVBmr0 iZ7nC0nHi8Zpu+GNxBptAQSmTldB/aiImb8VHItQTcq3qQM+mBGi+WqR31cPugDF I2+03f+V5xob0nkE3y00I9dqCpjzrRNrIIZUMJGy4pkpXZDzNWyjPN/Bg7FIRjyo XyLYHMI1ChOIkzq7yFrEgsI0qOo7j5jYX7DZOIAmX2TTvatYCoWqm1C3QrwRHUvI 2bSLdS+iEQp/fkue336btB1N8+VP5Q/Ri9KvHdJCiN1LAgMBAAGjgaAwgZ0wDAYD VR0TAQH/BAIwADA6BgNVHR8EMzAxMC+gLaArhilodHRwOi8vc3ZyLW92LWNybC50 aGF3dGUuY29tL1RoYXd0ZU9WLmNybDAdBgNVHSUEFjAUBggrBgEFBQcDAQYIKwYB BQUHAwIwMgYIKwYBBQUHAQEEJjAkMCIGCCsGAQUFBzABhhZodHRwOi8vb2NzcC50 aGF3dGUuY29tMA0GCSqGSIb3DQEBBQUAA4IBAQB9zifSRfQLsQIbFcfrBg9E1R0o Nx5sco6WHQ3f8v4RrGO4ZAMGnqDlsAjEG88LzQfeVkqcAmsTWxCyCHW0iGWvUbfN cAHvLdr9VlLmUnz3wg69VgnW+fwppPAyD1L1ZEafESw5eoivkjcQ5DIedjjKwYiI FjkLngEOORkBhKmyGLlV7nXWG0VmJkDt5xHH5i3rVq1G8sEV743kSLtK/Dugn7Hf HSYbiyDpHv8EJmFBYtFFYIPUyKOPowaTu2zj9qJz83X5oLulBd6eLZfaAgsjZ/Rb 1MTfRzgI2mur/IiTx9KL7Ymg+NJm7y7/wb1Fy438OwBANG6VrJUJqjxyYR/a </ds:X509Certificate> </ds:X509Data> </ds:KeyInfo> </KeyDescriptor> |
Your resulting metadata document would look something like this:

Save the meta data as a file and use it in one of the following steps for the OIF Server below.
Oracle Identity Federation Configuration Steps
1) Add the ServiceNow SP Metadata into OIF
Navigate to -> Administration -> Federation

Click on the “+ Add” button

Load the meta data file that you created and saved from ServiceNow service provider instance.
This will create Relying Party Provider for OIF.
2) Configure the new Relying Party Record in OIF
Select the newly created provider and click on the “Edit†button to manually edit the provider settings:

On the “Oracle Identity Federation Settings Tab†make sure you have the following settings:
Under “Attribute Mappings and Filters†check “Email Address†and “Transient One Time Identifierâ€

Under “Assertion Settings†enable “Send Signed Assertionâ€

Under “Protocol Settings†enable:
“Include Signing Certificate in XML Signaturesâ€

Under “Messages to Send/Require Signed†enable “Send Signed†for Request – HTTP Redirect

Testing the Integration
For this setup, we used email address as the token that the IdP would share with ServiceNow for the identity once successful authentication takes place. In order for this scenario to work, you must have a user created in the ServiceNow users list that has an email address that is the same as the user in OIF that you will be testing with.
To initiate SSO go to your service-now domain. It it configured to use SP initiated SSO. You should see that you are re-directed to OIF for authentication. Once authenticated you will be redirected back again to Service-Now were you will be logged in.
Credits
Many thanks to Warren Strange for reaching out to me to set up this configuration. Also thanks to the engineers on the Oracle side for answering our questions. Finally, many thanks to ServiceNow for provisioning a demo instance for us to work with to prove out SAML 2.0 functionality between OIF and ServiceNow.


John,
Do you have this same info for config with Ping Federate product? We are looking to configure Ping Federate and Service-now in the next few days. Navagis is our service vendor but i wanted to ask to see if you already had some info on the config with Ping. I’m not sure if Navagis has done this with Ping yet .
Any help would be appricated
Thanks
Eric merkle
@Eric,
I have helped customers in the past implement SAML 2.0 between ServiceNow and Ping Federate. However, I unfortunately don’t have any documentation on the subject as I wasn’t able to get anyone to give me screenshots for the steps on the Ping Federate side.
I do know it has been done a few times. If the implementation runs into a snag, I would recommend utilizing my update set at:
https://john-james-andersen.com/blog/service-now/servicenow-saml-2-0-additional-configurations-update-set.html
Then in the SAML properties uncheck my new checkboxes for the:
This solves the majority of problems with SAML issues between many IdP’s.
Looks like we are seeing issues with getting Ping to work with the SAMl 2.0 plugin. We currently have a incident open with HI. Since we are a new customer we are hoping that are service vendor will help us resolve our issues. The current Hi ticket is INT1976274.
We don’t want to install that update set unless we know if it is required to get things running and the worry that we won’t be supported if we do apply it.
@Eric,
I just checked out your incident. The error that you are reporting is one that has been happening to other customers in the past month or so. When you do an upgrade or install the SAML2 plugin, there are times when the SAML Jar files don’t get loaded properly on all of the nodes in your instance.
You need to let support know that this error is due to Jar files not being loaded properly with the plugin and ask them to reload them.
Hello,
Thanks for the great article.
I was wondering if you have done SSO between Salesforce and OIF 11g. ? If yes, then any documents for the same ?
We are trying to do it, but facing innumerable challenges.
Any help will be greatfully receivied.
regards,
@Gaurav. Unfortunately, most of my experience with SSO is between ServiceNow and other IdPs such as OIF. I don’t have much experience with Salesforce.
We have followed the steps provided. When we test we enter the domain for Service Now and it redirects to the following URL:
https://idm-train.blah.org/fed/idp/samlV20?SAMLRequest=nVNdb5tAEPwr6N75NCbpyViiRFUtpSkxtA992xxLchLc0dvDdv99ATuJHxqr8uvu3O7M7NyKoGujnmeDfVFb%2FD0gWefQtYr4sZOywSiugSRxBR0St4KX2bd7HnkB7422WuiWORkRGiu1yrWioUNTotlJgT%2B29yl7sbYn7vtAAhWNIGtAKo%2BOEFfpvSd05yvY9fCMXq2Z80UbgTOrlDXQEjJnc5ey8iFPxDJeikWS3MJtUMeiSW6eohsM4FPcLJKoGYFUAJHc4ftTogE3iiwom7IoCCM3SNxwWYUJjxc8iL14mfxiTnHS81mqWqrny%2BKfjiDiX6uqcIvvZTUP2MkazcOIvkr3TzQTcCTpBWy9mo%2FAZ%2Frm%2FC6XmcHrMdj6%2Fyis%2FPNFp7U9n1Rs7grdSvHHydpW73ODYEdl1gw4H6kD%2BzGX0AvniqzdZoZy7EC2WV0bJGJOWUwbHgdoZSPRXGOY%2F0b2lF6s59SMMbR4sE6uux6MpMlSPICwb6aew%2FJ2tGyLzVUWX4QJLqbZY3nK5F6besoYipFnZUBRr419df9fjNan5gf63tvnP3j9Fw%3D%3D&RelayState=https://blahtrain.service-now.com/navpage.do
But then we get a 404 error. Is there something else that needs to be enabled on the OIF side?
@Cam, It sounds like your browser is being redirected to an IdP url that the browser doesn’t have access to. Either that URL is wrong, or it is behind a firewall. You will need to contact your IdP admin to help you verify the URL and access to the URL from your browser.
Question please – How to build a metadata from scratch? What info do I need to build this metadata? Thank you!
@DannyBoy – ServiceNow’s SAML plugin has a “Metadata” link in the SAML application. You click that link and it will generate a metadata XML document. You can copy that document and paste it into a text editor. Then, add the certificate information as I show in this blog post.
I’m trying to do this setup but authenticating with Active Directory, but I can not make a satisfactory configuración. Should I make any special settings in the SAML Identity Provider and / or Service Provider?.
Finally I must make SAP Gateway Server federate with OIF 11g.
MetaData file is exported from SAP Gateway Server, then I do the import of this metadata in OIF11g as a Service Provider. What are the next steps to have an OIF 11g and SSO with SAP Gateway Server?
I really appreciate your help …