I was recently asked to provide a newsletter for several internal teams within our company. The first few months were a pain as I had to use an HTML editor to generate a decent looking newsletter each time I wanted to get the word out on some articles that I have been creating. Finally, I asked myself why I was going through all this pain when ServiceNow would be the perfect platform to build a newsletter application that automates most of the tasks.
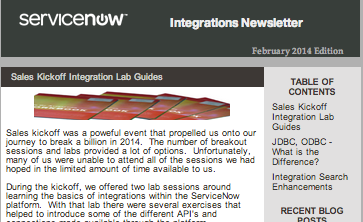
Within a couple of days I had a pretty decent application that would allow me to create newsletters with templates, dynamic variables, scripting capability, and article management. Since then, the writing of my newsletters have become much easier to do. Organizing my articles and sending them out to distribution lists are so much better than my copy and paste solution with my previous method.
I’ve decided to share this application with others who would like to take it and implement it within their own instance. It is not perfect, and there are several and him that I would like to perform in the future. However, if you’re not afraid to play with it, I think you will find it to be a great help to you in creating your own newsletters.
The Application
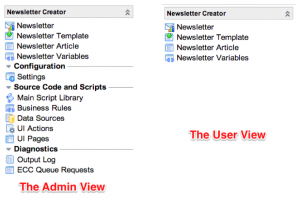
The application comes with two basic roles. The first role is the newsletter user role. This user can create and manage templates, articles, variables, and newsletters themselves. They can also send out the newsletters when they are ready.
The second role is a newsletter administrator role. The newsletter administrator can do everything that the newsletter user role can do. In addition, it has access to the settings, the scripts and diagnostics sections of the application. This allows the newsletter administrator user the ability to change how the application works.
There are four main components of the newsletter creator. The first is the concept of a newsletter template. This allows you to generate HTML and text based templates that determine the look and feel of the newsletter when it is generated and published. The next component is the newsletter articles. Each article is its own record and has both an HTML format as well as a plain text format. The third component is the newsletter variable object. Variables can be used with a newsletter templates. They allow for dynamic content changes within a newsletter from issue to issue. Finally, the fourth component is the newsletter itself. The newsletter record as a template associated with it along with articles and variables. It is from the newsletter that the final draft is generated and can be sent out to recipients.
Newsletter Templates
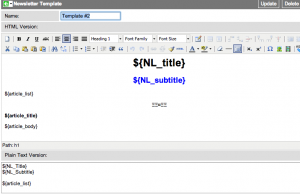
The newsletter application comes with several different templates. Some of these templates are very basic, while others are more complicated. Templates include a WYSIWYG editor that can be used for basic HTML formatting. If you would like to get more complex, you can click the HTML button within the editor and utilize CSS and HTML tags to build out a more precise template.
Templates leverage variables to allow dynamic content to be entered into the newsletter with each newsletter edition. This allows you to change month names, article content, or sidebar content in your newsletter without having to modify the template every time. Variables are denoted in the template record with a “${}” notation. For example, if I had a variable by the name of “month”, I would insert it into the template as: ${month}.
There are two groups of variables that are available within a template. The first group is a set of prebuilt variables. These variables come from the newsletter record and others are special for the article insertion:
- NL_title – The value of what is in the newsletter’s “Title” field
- NL_subtitle – The value of what is in the newsletter record’s “Subtitle” field
- article_list and /article_list – These variables are similar to HTML tags. They denote the section within the template that will be replicated for every article associated with the newsletter.
- article_title – This is the value of the article record’s “Title” field. It will be generated for each article associated with the newsletter.
- article_body – this is the value of the article record’s “Body” content field.
The second group of variable available within the template is a newsletter variable. These are variables that are defined on the newsletter record and are independent of the template. These variables can have any name that you wish as long as it is not one of the prebuilt variable names mentioned above.
For examples on how these variables are leveraged within a template, check out the examples that come with the application.
Newsletter Variables
Newsletter variables are declared from within the newsletter record itself. These variables are associated with that particular newsletter. When you generate the draft of your newsletter, those variables will be applied to the template.
When declaring variables on a newsletter record, you need to understand the difference between the two types of variables that are available to you. The first type of variable is a “Text variable.” This variable contains a static string that will replace the variable once the newsletter is generated. For example, if I have a variable called “month”, and the value is set to “January”, Then when my newsletter is generated, the ${month} text within the template will be replaced with: “January”.
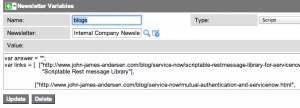
The second type of newsletter variable is a script-based variable. These variables contain JavaScript rather than a plain-text value. In these variables, you execute your script and save the result of the script to a variable. That variable should be the last line of your script. Whatever that variable contains at the end of the script execution is what will be used to replace the variable within the template. These are useful if you want to build a dynamic table of contents, pull an RSS feed in from another location, or insert your company’s latest stock quote.
The following example is a newsletter script that builds out a couple of links for the newsletter:
1 2 3 4 5 6 7 8 9 10 11 12 13 14 15 | var answer = ""; var links = [ ["https://john-james-andersen.com/blog/service-now/scriptable-restmessage-library-for-servicenow.html", "Scriptable Rest message Library" ], ["https://john-james-andersen.com/blog/service-now/mutual-authentication-and-servicenow.html", "Mutual Authentication and ServiceNow" ], ]; for (var key in links) { answer += '• <a href="' + links[key][0] + '">' + links[key][1] + '</a><br/>\n'; } answer; //Whatever is here is what replaces the variable in the template |
Newsletter Articles
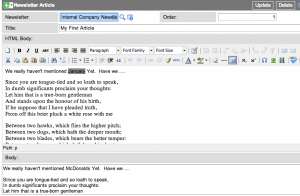
Each newsletter article record should contain one article. You can define the article title as well as both an HTML body as well as a plain text body. You have the same HTML editor capabilities as you do with the newsletter template. This provides you some great flexibility in creating a particular article.
You can create articles either from the “Newsletter Article” module within the application, or from a newsletter record as well. When creating a newsletter article from a newsletter record, the article will automatically be associated with that newsletter edition. Articles that are created from the module must be assigned to newsletters manually.
Newsletter article records also contain an “order” field. When you associate articles to a newsletter, the articles will be ordered relative to the various order values set on each article. The lower the number, the higher up it will appear in the newsletter.
I like to create articles throughout the month as newsworthy items occur. Then, near the end of the month, I associate the articles to the various newsletters that I’m going to send out.
The Newsletter Record
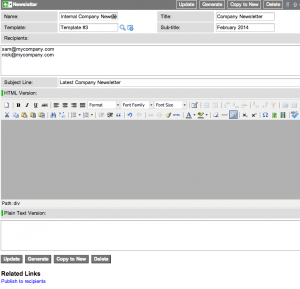
The newsletter record is the center place of managing your newsletters. you can create articles, managed templates, and create variables from the newsletter record.
The “Title” and “Subtitle” fields are what feed the “NL_title” and “NL_subtitle” variables in the Newsletter Template.
The “Recipients” field on the newsletter form allows you to add email addresses for each individual that is to receive your newsletter. I like to do one email address per line in this field. At this point in time, I do not have a feature for subscribing and unsubscribing to a newsletter, or using any type of member management system.
The “Subject Line” field is what will be placed in the email’s subject line when the newsletter is sent.
When you have all the components of your newsletter compiled and organized, you can click the “Generate” button on the form to generate a preview of your newsletter in the HTML and plain text fields. Please note, if you have anything in those fields to begin with, they will be overwritten when the newsletter is generated. I debated on making these two fields read-only, however, I decided it might be useful to allow the user to make slight modifications to the newsletter after it was generated.
Once you are happy with your newsletter and you are ready to send it out to the recipients, click the “publish to recipients” link at the bottom of the form. This will schedule an email to be sent out to each email address that was listed in the recipients field on the form.
Demo Video
Version 1.2 Updates
New Enhancements:
– Added a contributors field for Newsletters and Templates to control who can view and work on the various records
– Added a NewsletterCreatorUser role in addition to the existing NewsletterCreatorAdmin role.
– Updated ACLs to support the concept of contributors
– Checked menu to show “My Newsletters”, “My Templates”, etc
– Added better support for images. You can now upload an image to the instance and then reference that image successfully in the newsletter. Attachment images don’t render correctly in most email clients due to a platform restriction. You need to set the base url in the system property field in the settings page for this to work properly.
Download
You can currently download this solution from the ServiceNow Share Portal:
Newsletter Creator Application



Hey John, great stuff again! Question on the number of recipients: unlimited? Each recipient needs to be on a separate line? Comma-separated would be handy I think….
Thanks!
BR,
FredK.
@FredK…Yes, the recipients field is very large so you can have any number of recipients. They can also be comma separated as well.
Hi John, this is awesome stuff!! Thank you. It sure makes the work easier. I have an urgent request – my email shows that the event has been fired – I had clicked publish and send to recipients.
However, the emails are not coming through. It simply remains at send-ready state. Is there something I have overlooked?
Thank you.
Pamela
Hi John… this is great, thank you! I have a question about the recipient field… I presume it is not translated to the BCC but the TO field on an email… is that correct? thus if you had a large # of users you were sending to, they would all see that. How would you make it default to add the recipients to the the “BCC” field. (again, presuming that they are showing up in the TO field).
Is there a way to send a newsletter to every active user in our SN instance without adding each user individually to the recipients field? Thank you.
Hi John the link provided is no longer working, and it redirect to a page not found.