As I am in the business of creating integration-based applications for the ServiceNow platform, I am trying to come up with an Application template that makes an integration easy to use, easy to configure, easy to maintain, and easy to debug. In order to do this, I am a big fan of making applications that contain all of the moving parts within the application to make it faster to administer the integration.
Creating an integration application can be time consuming if you really want to add all of the components that make it a good integration to administer. I have therefore created an tool that allows you to essentially (at a bare minimum) enter in the name of the Integration Application that you wish to create. The tool will create a bare bones integration framework and menu system for you.
One important note before we go any further. This is not to compete with, nor does it do the same thing as the new Application Creator feature in the new Calgary Release of ServiceNow. That feature is for the creation of actual applications for the platform. This tool focuses on creating the basic building blocks and menu items for an integration so that it is easily managed in the application menu pane.
How to use the Utility
Assuming you have loaded the update set into your development instance, navigate within ServiceNow to System Definition > Integration App Generator.
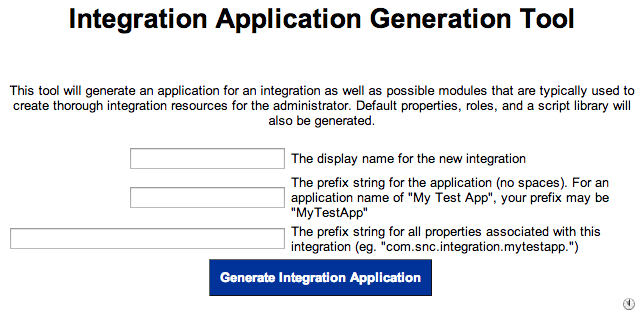
This will display the generator utility. The tool has three fields that you can customize. However, by default, if you just type in a value for the first field, the other two fields will auto-populate with suggested values which can then be modified by you.
The Application Name field is the name of the application that the tool will generate. Any time there integration wants to display the “Pretty” name of the application, it will use this string.
The Application Prefix should be a straight alpha-numeric field. There should be no spaces. This will be the default Source value in all log statements, it will expect all business rules, script includes, etc to start with that prefix string.
The Application Property Prefix is the prefix used on System Properties that are generated by the tool. I typically use “com.snc.integration.[APP_NAME]” as my prefix to property names, and that is the convention that I use for this utility.
The “Generate” button will take the field values you used and create the integration application.
What gets generated?

Application Menu
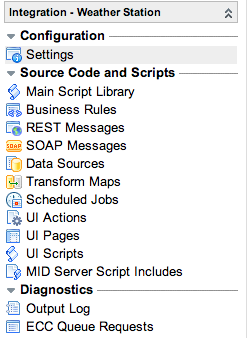
The most visual parts generated by the tool are the Integration Application and its corresponding modules.
The first module is the Settings Page. System properties for your integration should be created and show up under this module. A System Properties category is created for your integration. If you add properties under that category, they will show up automatically on this page.
The Source Code and Scripts lists potential areas that may contain custom code around your integration. If you do not end up using some of those technologies, simply delete the module from the application menu. For items to show up in this list, you will need to preface their names with the “Application Prefix” you used in generation utility.
The Diagnostics section offers an output log based on log statements that have a source of the “Application Prefix” string you specified with the tool.
Integration Admin Role
The utility creates a user role specific to the integration. It will have a name of your integration application in it. In the example where my “Appplication Prefix” was “WeatherStation”, my integration admin role would be “WeatherStationAdmin”.
You can use this role to set up any ACL’s you wish for the integration. Also, the menu will only be visible by users that have the integration’s admin role.
System Property Category
A system property category is automatically generated that provides a place for you to link to system properties that you create. The name of the properties category is the “Application Name” that you used in the tool.
System Property
A system property is automatically generated for logging levels, and it is set to 3 (the debug log level). You can change that value through the “Settings” module in the integration application menu that was generated.
To add more system properties for your integration, go to the System Properties > Categories module and add properties there. They will automatically show up in your integration’s Settings module.
Main Script Library
A script include is also generated. It will have the name of your “Application Prefix” string. This script include is linked to in the Application Menu as the “Main Script Library”. It comes pre-generated with logging functions that allows for different logging levels within the integration.
Download the Update Set
Please understand that you use this with your own risk. It should never be installed and used on a production instance. Use this tool to generate the application in a development instance and capture the changes in an update set that will then ultimately be transferred to a test and production server.


This is great, thanks for sharing!