Recently, ServiceNow added inbound WS-Security profiles as a SOAP interface option into the system. I have had several customers ask how this works, so I have created the following tutorial.
This article will demonstrate how to set up a self-signed certificate, generate a SOAP client that utilizes the certificate, and configure a ServiceNow instance to accept SOAP communication using the x509 Certificate WS-Security profile.
Create a self-signed certificate
The idea behind the x509 WS-Security profile is that you can sign your SOAP request and provide a key that a service can use to verify that the data in the SOAP request has not been tampered with. Typically, you would go through a certificate company to sign your certificates for third party consumption, but for testing, it is perfectly valid to generate your own certificate and sign it yourself.
Since many of my clients use Windows, we will create our self-signed certificate from a windows box. To do this, you need to make sure you have Java installed somewhere on your machine, and that the Java “bin” directory is in your PATH.
In a command shell, you can create and sign a certificate in one fail swoop by issuing the following command:
1 2 3 4 5 6 7 | keytool -genkey -keyalg RSA -alias YOURALIAS -keystore YOURDESTKEYSTOREFILE -storepass YOURDESIREDKEYSTOREPASSWORD -validity NUMBEROFDAYSYOURCERTSHOULDBEVALID -keysize 2048 |
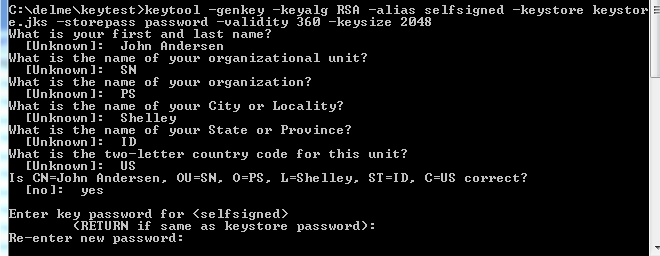
When you execute this command, the system will ask you some questions which you just fill in with arbitrary values. This is what it looked like for me:
This created a keystore file named: keystore.jks. It is a Java keystore that contains my new certificate and the public and private keys.
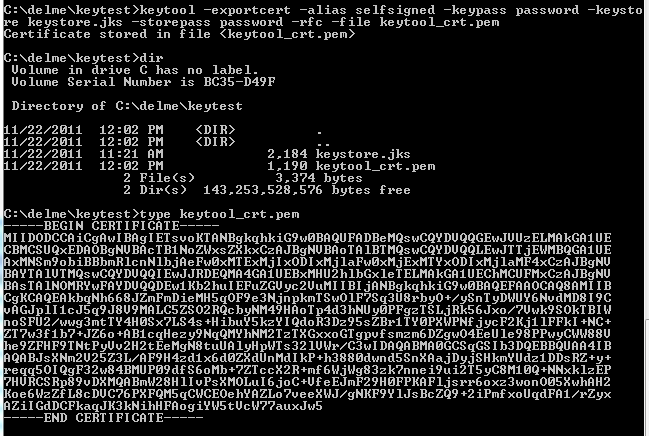
Down the road, I am going to need to store that certificate into ServiceNow in PEM format. So, right now I can make another “keytool” call to extract the certificate from the keystore and save it in PEM format:
1 2 3 4 5 6 7 | keytool -exportcert -alias ALIASFORYOURCERTIFICATEINKEYSTORE -keypass YOURKEYPASSWORD -keystore SRCKEYSTOREFILENAME -storepass KEYSTOREPASSWORD -rfc -file DESTPEMFILENAME |
This will create a file with a .pem extension that contains your certificate in PEM format. Here is what it looked like for me:
Set up SOAP-UI
For this tutorial, our SOAP client will be the free SOAP utility: SOAP-UI.
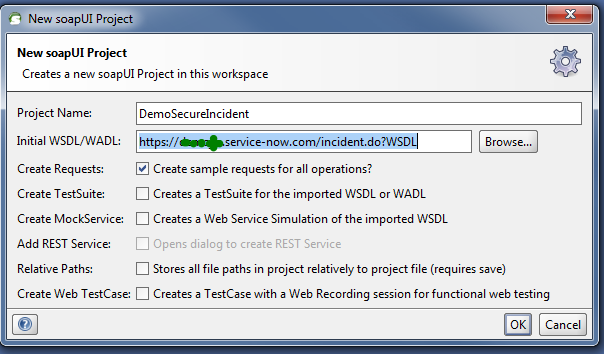
I first loaded my “incident” WSDL into SOAP-UI to create a new project.
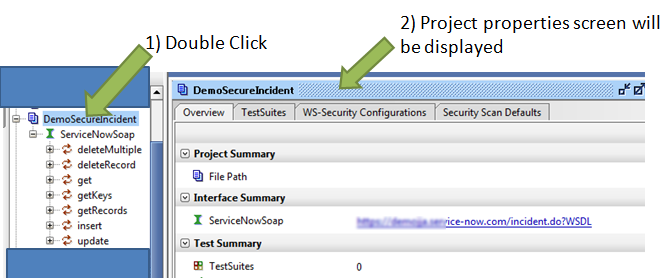
Once the project is created, you want to double click on the project itself to view the properties.
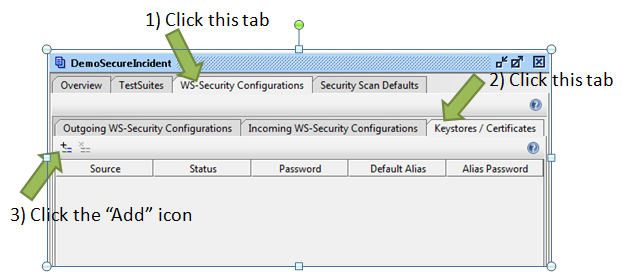
On the project properties dialog, you will click the WS-Security Configurations tab, and then click on the “Keystores/Certificates” subtab. In the sub-panel that appears, you will want to click the “Add” icon to add the keystore that we created earlier.
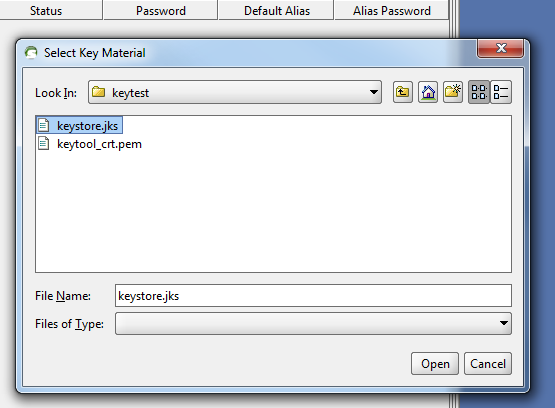
Browse to the keystore file that we created and select it and click the “Open” button.
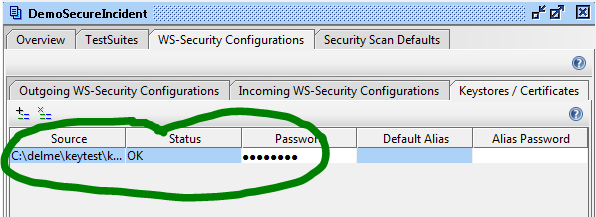
When SOAP-UI attempts to open your file, you will need to enter in the keystore password. Use the password that you entered earlier for the keystore.
Once you have completed this, your keystore should be listed in the Keystores/Certificates list. Make sure that your “Status” field is “OK”. If there was a problem loading your keystore, you will see an error there.
Now that we have loaded our keystore, we need to create an “Ountgoing WS-Security Configuration” profile that will leverage our keystore.
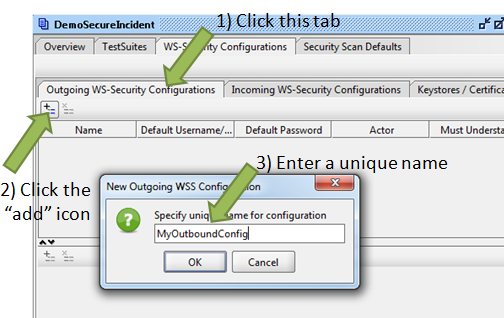
To do this, click on the “Outgoing WS-Security Configurations” subtab on the project properties dialog, and then click the “Add” icon. You will be prompted to provide a name for your configuration. You can name it anything as long as it is unique to the project.
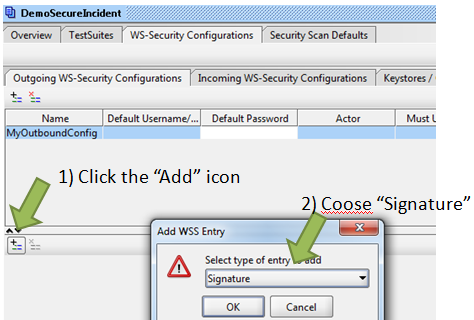
Once you have created your configuration, you will need to click the “Add” icon in the lower pane to add the types of security your request will employ. You will want to select “Signature” since we will be signing our SOAP Request.
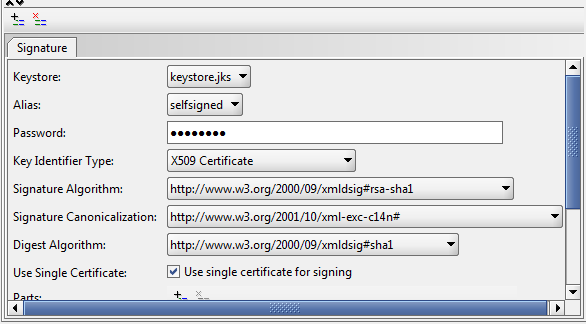
Now you should see the settings for signing a SOAP request. Select your keystore file name, the alias that contains your certificate & keys, and your keystore password. Make the Key Identifier type be: x509 Certificate. Use the RSA-SHA1 signing algorithm with the xml-exc-c14n canonicalization. Also, select the SHA1 digest algorithm.
Configure ServiceNow Instance
Now that our client is setup with our keystore, we need to configure ServiceNow to accept SOAP requests using the x509 WS-Security profile.
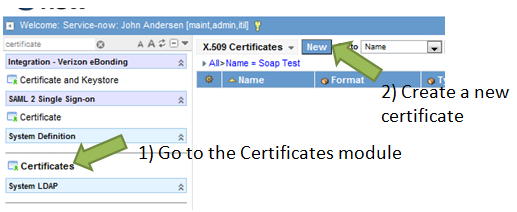
First we need to load the certificate that will be used by SOAP-UI to sign the request. If you recall, we created a PEM version of the certificate just after we created the keystore file. You will want to copy the contents (PEM String) from that file and copy it into a new Certificate record in ServiceNow. Then click the “Submit” button.
Once you have done this, your certificate record should be listed with any other certificates you may have loaded into your instance.
Now we need to set up a WS-Security profile in ServiceNow to accept and validate x509 signed SOAP requests.
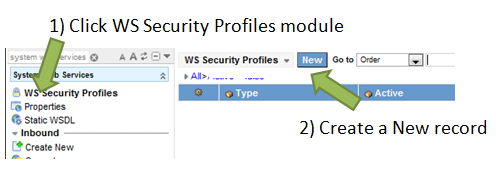
Browse to the “WS Security Profiles” module inside of the “System Web Services” application. Once you are there, create a New profile by clicking on the new button.
From here you select the x509 profile and select the user you would like this profile to execute as with the SOAP action. You will also need to select the Certificate record we just created so that we can validate the signature.
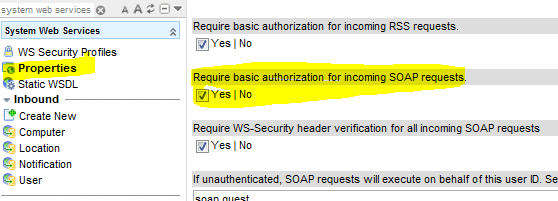
You may wish to restrict all SOAP requests to use WS-Security when they come into your instance. If you choose to do so, you will need to select the setting found in the “Properties” module of the “System Web Services” application that enforces WS Security for inbound SOAP requests.
Your instance is now configured to accept signed SOAP requests with an x509 token.
Test your setup
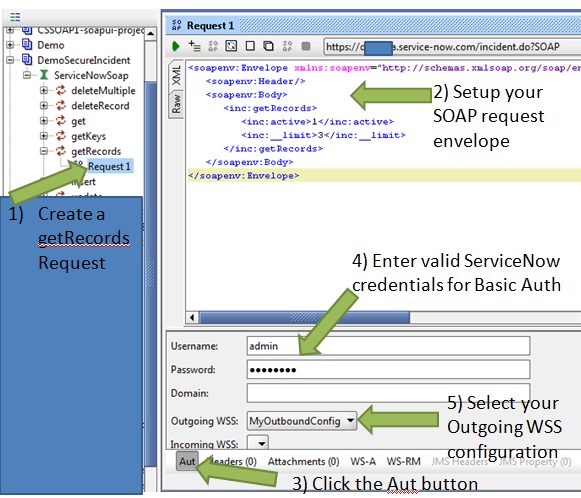
In order to test this, we go back to our SOAP UI project and create a Request on the “getRecords” web service function.
We are going to request three active incident records using the following XML:
1 2 3 4 5 6 7 8 9 | <soapenv:Envelope xmlns:soapenv="http://schemas.xmlsoap.org/soap/envelope/" xmlns:inc="http://www.service-now.com/incident"> <soapenv:Header/> <soapenv:Body> <inc:getRecords> <inc:active>1</inc:active> <inc:__limit>3</inc:__limit> </inc:getRecords> </soapenv:Body> </soapenv:Envelope> |
We will paste that XML into the request window. Then click on the “Aut” button at the bottom of the request dialog box in SOAP-UI. There you will need to enter your basic authentication credentials. (At this point in time ServiceNow requires that you use BasicAuth in conjunction with a WS-Security profile). Finally, select the Outbound WS Security configuration that we created earlier.
Once you submit your request through SOAP-UI, you should successfully connect, authenticate, and receive the response you requested:







Can you please let me know your RAW Xml details, since there is known bug in SOAP UI usng X.509 certs for signing.
Could you please share the Sample SOAP envelope ?
Also i would like to know if i want to set up this in two servicenow demo instances, how it can be done ?
Great Article John!!
I was able to use ServiceNow instead of SOAP UI to call a webservice running on another ServiceNow Instance.
Hi John,
I have configured this within two servicenow instances. But when I send request just using Basic authentication , the request allowed inside the other instance though I have X509 web service security profile configured.
Could you please help me out?
Thanks,
Rahul
This blog helped me configure with SOAP Client great job.
I am searching for the same with AXIS client.
Thanks
Ram Kundala
Hii guys,
We are creating a web service for interaction with soapUI. The properties glide.basicauth.required.soap and glide.soap.require_ws_security are enabled for web services. I have uploaded the x.509 certificate and created ws security for the certificate. I configured the WS-security configurations in soap but records are not fetched or inserted. How to fetch or insert the records into sn if the properties glide.basicauth.required.soap and glide.soap.require_ws_security of web services are enabled?
Thanks,
Siddarth trivedi.
Great article,
if only the ServiceNow documentation contained such information regarding this topic. Thanks!