
I have had a number of customers within ServiceNow ask me about active directory Federation services (ADFS 2.0). While ADFS reports it is able to do SAML 2.0 authentication, the terminology and setup has made it a bit complicated for people to connect via SAML 2.0 in ServiceNow.
The other day, I worked with John Gubatayao from Navigis (a ServiceNow partner) and David Pesano (a customer) to get authentication to take place between ServiceNow and the ADFS 2.0 service.
During our efforts, we found some documentation that says the ADFS does not support service provider initiated login. Thus, our examples use an identity provider initiated authentication model.
PLEASE NOTE: At the time of this effort, there was documentation stating that ADFS did not support SP initiated authentication in some circumstances. Current documentation specifies that it is supported. However, this example only covers IdP-Initiated authentication.
For information on how to set up an SP-Initiated Authentication between ServiceNow and AD FS, see my post on Fixing SP Initiated Login with ADFS 2.0 and ServiceNow SAML after following the instructions on this blog to get things set up.
David did a tremendous job documenting every step he took to get the ADFS to communicate with ServiceNow. While I have submitted his documentation to the ServiceNow documentation team for their approval and edits, I would like to place the raw documentation here so that those people that need it quickly and get it today.
General AD FS Setup
Log into your ADFS 2.0 server and open the management console. This document will use samportal.example.com as the ADFS 2.0 website. Replace this with your ADFS 2.0 website address.
Right click on Service and choose Edit Federation Service Properties…

Confirm that the General settings match your DNS entries and certificate names. Take note of the Federation Service Identifier as that will be used to enter into the Service-Now SAML 2.0 configuration settings.

Browse to the certificates and export the “Token-Signing†certificate;
- Right click the certificate and select “View Certificateâ€.
- Click on the “Details†tab.
- Click on “Copy to File…†The Certificate Export Wizard will launch.
- Select “Next >â€.
- Ensure “No, do not export the private key†is select and press “Next >â€.
- Select “DER encoded binary X.509 (.cer)†and press “Next >â€.
- Select where you want to save the file and give it a name and press “Next >â€.
- Finally, select “Finishâ€
Service-now requires that this certificate be in PEM format. You can convert this certificate using client tools or even online tools such as: SSL Shopper. Use the DER/Binary certificate we just created and export it to “Standard PEM†format.
ServiceNow SAML 2.0 Settings
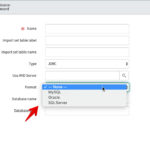
Log into Service-Now as an administrator and browse to “SAML 2 Single Sign On†and select Properties. If SAML 2 is not listed, you will need to contact Service-Now to have it enabled.
The correct settings for this example would look something like the following (except for the fact that External Authentication is turned off):

After entering in the correct information, select SAVE and then browse to the “Certificate†page. At the top right corner, select the paper clip and attach the PEM certificate we created earlier. Sometimes the certificate’s fields such as Issue and Subject do not populate after selecting save and there may be an error on the top of the page. If this is the case, open the saves PEM formatted certificate in notepad and copy and paste the certificate in the “PEM Certificate:†field followed by clicking on “Updateâ€. This page should have all the areas filled out.
AD FS Relying Party Configuration
At this point you could take the Service-Now Metadata and import it into your ADFS server. However, manual configuration of the Relying partner appears to be easier to implement.
Open the ADFS 2.0 Management console and select “Relying Party Trustsâ€.
- Select “add Relaying party Trust…†from the top right corner of the window. The add wizard will appear. Click on “Start†to begin.
- Select “Enter data about the relying party manually†and select “Next >â€.
- Give it a display name such as “Service-Now†and enter any notes you wish finished by selecting “Next >â€.
- Select AD FS 2.0 Profile and click “Next >â€.
- Do not select a token encryption certificate and click on “Next >â€. It will use the certificate that is defined on the service that has already been exported. Defining a certificate here will prevent proper communication with Service-Now.
- Do not enable any settings on the “Configure URL†and press “Next >â€.
- Enter the Service-Now website you connect to as the Relying Party trust identifier. In this case use ‘https://company.service-now.com and click on “Add†and then click “Next >â€.
- Permit all users to access this relying party and select “Next >â€.
- Click “Next >†on the Ready to add page and uncheck “Open the Claims when this finishes†then close. You should now know see the Relying Party in the window.
- Right click on the Relying Party trust and select “Propertiesâ€.
- Browse to the “Endpoints tab†and add a “SAML Assertion Consumer†with a “Post†binding and a URL of https://company.service-now.com/navpage.do.
AD FS Relying Party Claim Rules
Now is the time to edit the Claim rules in order to enable proper communication with Service-Now.
- Right click on the Relying Party and select “Edit Claim Rules…â€
- On the Issuance Transform Rules tab select “Add Rules…â€
- Select “Send LDAP Attribute as Claims†as the claim rule template to use and select “Next >â€.
- Give the Claim a name such as “Get LDAP Attributesâ€. Attribute Store should be set to “Active Directory†and LDAP Attribute should be “E-Mail-Addresses†and the Outgoing Claim Type should be E-mail Address.

- Select “Finishâ€.
- Select “Add Rule…â€
- Select “Transform an Incoming Claim†as the claim rule template to use and select “Next >â€.
- Give it a name such as “Email to Name IDâ€. Incoming claim type should be “E-mail Address†(it must match the “Outgoing Claim Type in rule #1â€. Outgoing claim type is “Name ID†(this is requested in Service-Now policy “urn:oasis:names:tc:SAML:1.1:nameid-format:emailAddressâ€) and Outgoing name ID format is “Emailâ€. Pass through all claim values and click on “Finishâ€.

- If you edit the existing rule and click on “View Rule Language…†they should match the following:
Rule #1:
c:[Type == "http://schemas.microsoft.com/ws/2008/06/identity/claims/windowsaccountname", Issuer == "AD AUTHORITY"]
=> issue(store = "Active Directory",
types = ("http://schemas.xmlsoap.org/ws/2005/05/identity/claims/emailaddress"),
query = ";mail;{0}", param = c.Value);
Rule #2:
c:[Type == "http://schemas.xmlsoap.org/ws/2005/05/identity/claims/emailaddress"]
 => issue(Type = "http://schemas.xmlsoap.org/ws/2005/05/identity/claims/nameidentifier",
Issuer = c.Issuer, OriginalIssuer = c.OriginalIssuer, Value = c.Value, ValueType = c.ValueType,
Properties["http://schemas.xmlsoap.org/ws/2005/05/identity/claimproperties/format"]
= "urn:oasis:names:tc:SAML:1.1:nameid-format:emailAddress");
Open internet explorer and browse to https://samportal.example.com/adfs/ls/idpinitiatedsignon.aspx and you will be at a generic page with a drop down list of all Relying Party Trusts configured. Select one you wish to log into and click on “Continue to Sign Inâ€. Of course, it will only work if you have enables SSO on the Service-Now web page. If it is configured properly, then you should now be logged in. You can also create a direct link so users do not need to select from a drop down by browsing to https://samportal.example.com/adfs/ls/idpinitiatedsignon.aspx?logintoRP=https://company.service-now.com.
Now you should have an IdP initiated authenication method between ADFS 2.0 and ServiceNow SAML 2.0.
Again, many thanks to the research and documentation provided by John Gubatayao and David Pesano on this mini-project!
Post Project Notes
SP-Initiated Authentication
This blog did not cover getting SP-Initiated Authentication to work with ServiceNow and ADFS. For information on how to do this, see: Fixing SP Initiated Login with ADFS 2.0 and ServiceNow SAML


This wasn’t enough for David. Looks like he was able to set up the SSO Logout as well. According to his notes:
Right click on the Relying Party Trust and select properties. Go to the Endpoints tab and select add.
Endpoint Type = SAML Logout
Binding = POST
URL = https://samportal.example.com/adfs/ls/IdpInitiatedSignOn.aspx
Response URL = https://company.service-now.com/navpage.do
Nice follow through David. Great stuff!
The logout previously mentioned don’t really work very well. These are the links I have used and tested and appear to work a little better:
Edit the logout URL in the Service-Now SAML 2.0 properties to be : https://samportal.example.com/adfs/ls/?wa=wsignout1.0&wreply=https://company.service-now.com/navpage.do
Endpoint Type = SAML Logout
Binding = POST
URL = https://samportal.example.com/adfs/ls/?wa=wsignout1.0
Response URL = This can be left Blank.
Hello John,
I am working with a customer to deploy an identity federation solution based on ADFS.
The customer wants to replace his actual service desk with Service Now and then ask me if the SAML 2.0 module works with ADFS 2.0, and mainly if it is possible to forward roles to Service Now, or any other claim.
Additionally, is it possible to have most users which use SAML to authenticate, and have some users (from an external contractor for example) which can authenticate with a form or a referring URL.
Regards,
Le Nevez Arnaud
Arnaud,
The ServiceNow solution for SAML 2.0 only handles passing a user token at this time. All roles are applied locally as stored in the system and set on the local users.
So, unfortunately, we cannot currently use ADFS to pass rule information into ServiceNow via SAML.
-John
Thanks John,
Do you know if the ability to pass roles in the SAML Token will be added in a future release? And if so, is there a roadmap?
Arnaud
I haven’t seen that ability on a road map at this time.You may want to add an enhancement request.
Hi John,
do you know how to allow deep links in this setup? Service-Now typically send email notifications with links to the originating ticket. However, these links only work if have previously authetificated with the idp-link. Otherwise you get the ADFS logon page where you can’t sign in correctly. Service-Now will always complain about ‘Could not extract //Subject/NameID from SAMLResponse’. How can we fix this?
Thanks!
Daniel
Daniel,
According to some documentation found on the internet, “AD FS 2.0 does not support the declaration of a Target or RelayState parameter when it acts as the IdP during IdP-initiated SSO.” Without this, we don’t have any other supported method of getting a deep link into AD FS 2.0.
You can try to handle the “Could not extract //Subject/NameID from SAMLResponse” error by setting an error UI page or external website URL on the “glide.authenticate.failed_redirect†system property (see SAML 2.0 FAQ for a few more details).
If you do find a way to work around this issue, I would love to know about it.
Thanks!
John
Hi John,
Thanks a million, this was really useful for me, however I’m having a similar issue with the “Could not extract //Subject/NameID from SAMLResponse” message (posted on http://community.service-now.com/forum/7898 )
Is this the same issue as above, or am I missing something….?
Thanks again
Richard
Richard,
It sounds like the same issue Daniel is having. I believe it is due to the fact that AD FS 2.0 handles its SP-initiated authentication in a weird manner. I don’t know of anyone that has SP Initiated working today.
Could you provide a link to the documentation that says that ADFS 2.0 doesn’t support service provider initiated login, please, so I can take it to MS. They told me it did.
I did a fresh search on the matter and I can’t find that documentation. I swear it was on a technet page, but I can’t seem to find it now. There is more documentation stating that it is possible. Therefore, I would have to agree. This example still only covers IdP-Initiated authentication, but I would be willing to hear from anyone who is able to get SP-Initiated authentication to work. Sounds like it will be by using the “Relying Party Trust” feature in AD FS.
This is enormously helpful John. (And David)
Does this document about getting ADFS to consume RelayState provide what we need to perform deep linking? http://social.technet.microsoft.com/wiki/contents/articles/3338.aspx
Paul,
Thanks for your contribution. I have read the article at that link and it appears that they are discussing this for IdP initiated login. Typically, in SN, the deep linking is mostly used with a SP-initiated authentication.
Once I get someone in an SP-Initiated setup, I will try this method you suggested to see if it will help…it looks promising.
If you try this before me, let me know how it goes.
-John
Hello
Thanks for the useful information. Can you provide more details on how the session timeout process should be configured in Service-Now in an IdP initiated ADFS/SAML2.0 scenario. We want the users to be automatically logged back into SN when their session expires but are having issues getting it working. The login and logout processes work just fine…
Any suggestion you can provide would be much appreciated.
/Etienne
Etienne,
The reason behind the timeout issues that you are seeing is that apparently, ADFS requires a Service Provider (such as ServiceNow) to sign their requests that are sent to ADFS. These two requests are the AuthnRequest statement and the LogoutRequest statement.
At this time ServiceNow does not support the signing of its outbound SAML requests.
At a session time out, ServiceNow will attempt to send an AuthnRequest statement to your SAML IdP, but it will not be signed, causing your IdP to throw the error.
I am personally looking into options for ServiceNow users that are in this situation and hope to publish something in the near future.
Edited this article to include a link to my recent blog post that covers fixing ServiceNow to allow ADFS to handle SP-Initiated authentication.
Just edited this article to include a link to another recent blog post I made on a potential fix for issues around SingleLogout with AD FS. Check the “Post Project Notes” section near the end of this blog for details.
Hi John,
Great information. Working with a customer who likes ADFS for SSO functionality with Service.Now, so this was great.
However for Data Population they don’t like Service.Now initiated LDAP queries. Do they still need inbound LDAP queries – I seem to remember reading somewhere (though I can’t find it again – that if a user that is authenticated by ADFS doesn’t have a corresponding Service.Now rcord, it can automatically created? Is this so, or do you have any comment?
Do any of your customers (with Active Directory as their primary directory source) have similar LDAP concerns and if so how do they handle them?
Many thanks,
Garrett
Garrett,
ServiceNow SAML, wether through ADFS or any other IdP does not currently support provisioning of new users – only authentication.
There is an LDAP Authentication feature with ServiceNow that does auto provision new users, but that is different than SSO. ADFS SSO and LDAP authentication are essentially mutually exclusive.
-John
For those of you using Kerberos and hoping to bypass an ADFS login form during SAML SSO with ServiceNow, you may wish to check the following post I just created:
https://john-james-andersen.com/blog/service-now/supporting-kerberos-authentication-with-adfs-in-servicenow.html
Hi John,
Thanks for the useful information. Just wanted to know how do we setup ADFS in a multitenant environment.
Even a small clue would help us in proceeding further.
Many Thanks,
Xavier
Xavier,
Out of the box, ServiceNow does not currently support multi-tenant SSO. Crossfuze Solutions have done this before and may be able to build this out for you.
Hey John,
I’m totally new to this AD concept. I wonder how does this ADFS work.
Let me put it this way, lets say my user have different SSO password and Service now password and if my user user is logging through the SSO login page how would service now authenticate the user. Does the user data get auto-sysnced with ADFS integration.
Also would like to know whether the login id which user puts in is case-sensitive or not ?
Just wanted to make sure with these things before going ahead with the implementation
Thanks,
Xavier
John,
I found this article about fixing the Deep Link issue with Microsoft Federation Service.
I thought I share this solution with anyone that may have the same issue.
http://www.confusedamused.com/notebook/adfs-relaystate/
Hi John,
I was able to setup ServiceNow with ADFS 2.0 in our test environment. But since then we have upgrade to ServiceNow Calgary which has many more SAML settings and have not been able to get it to work. We are also using wildcard cert, but ADFS is working for our other setup with salesforce.
I am able to get the page to re-direct to ADFS, able to login but am automatically logout of ServiceNow. No error event in windows log as it is sending the info to ServiceNow. I notice error in browser “Could not validate SAMLResponse” then message “logout successful” but again wildcard cert is working with salesforce.
Any Advice would be appreciated.
thx
@Vinh – unfortunately, there is not much I can do in guiding you with this one. I would have to see it for myself. What I suggest is that you turn on Debug Logging (available in the ServiceNow SAML settings) and attempt the login. Then go to the ServiceNow system logs and view all of the messages listed there. It should list something more specific in addition to that “Could not validate SAML Response” error message that would give you a better idea of what the problem is.
Hi John,
Thanks, your work is proving very useful.
I have a customer who has multiple domains, and therefore requires two ADFS Servers for authentication.
Do you know if this is possible?
Thanks!
Jon, OOB the SAML plugin in ServiceNow allows you to connect to only one Identity Provider. You will either have to federate the ADFS Servers (not sure what this entails) or you will need to customize the authentication mechanisms in ServiceNow to allow you to connect to more than one Identity Provider. The ServiceNow Professional Services team has done this on occasion, but I don’t recommend it. It is a big project, and it overrides the current authentication methods. Thus, if SAML or other authentication methods are updated, you would not get those updates without manually copying changes to your customized solution.
Hi John,
Is it possible to have at the same time users which use SAML to authenticate, and have users (from an external contractor or customers) which can authenticate with a form or a referring URL.
Maybe try all with saml and if not logged, redirect to the side_door. But wiki says “Note that a logged-in user cannot access this page. Attempting to access this page while logged in produces a page not found error.” so that’s a problem.
Thanks!
@Christophe, At this time, SAML single sign-on authentication is global to the instance and only points to one identity provider. I know that ServiceNow is working on enhancing this to allow for multiple single sign-on methodologies in a single instance. This would accommodate what you are looking for. At this time, however, is not a reality unless you customize the out of box login features. I highly recommend against this as it becomes a large management effort with each subsequent upgrade to the platform.
Hi, the whole thng iss going sound here and ofcourse every one is sharing data, that’s in fact good, keep
up writing.
Unquestionably imagine that whjch you stated. Your favorite justification appeared to bee at the
web the simplest thing to be aware of. I say to you,
I definitely get irked whilst other people consider worries that they just don’t recognize about.
You controlled to hit thee nail upon the highest and defined out the
entire thing without having side effect , other folks can take a signal.
Will probably bbe back to get more. Thankk you!
Inspiring quuest there. What occurred after?
Goood luck!
I very delighted to find this web site on bing, just what
I was searching for 😀 also saved to bookmarks.
I think this is among the most significant info for me. And i am glad reading your article. But wanna remark on few general things, The website style is ideal, the articles is really excellent : D. Good job, cheers
Keep Posting !